Disclaimer: This is a super long post as I’m catching up on efforts starting back in October. Following updates will not be this long-winded.
Back in Hardware Mode!

It was nice to get the house into a living space for awhile instead of an ongoing parade of Home Depot bags and having to wear shoes everywhere indoors. That said, after my party in October, I tore into the dining rooms tired white paint, dated (think 80s cheap, not old school cool) fixtures, and needy woodwork/floors. However, since I’m neither Tony Stark nor an annoyingly destructive HGTV flipper, no sledgehammers were involved.
Last Time On…
To talk about where I’m going, it’s nice to take a look back where things started.


The house had aging and scuffed white paint, threadbare carpet. The shellac on the woodwork had fossilized several generations of tobacco smoke and coal soot like prehistoric amber.
As part of the earlier effort in flooring, the carpet and residual padding were both removed, but the shellac and damage was still very present. I also had a strong dislike of the prism and candelabra style light fixture. The sockets are loose and flicker when touched.
Plagiarize!
I had been shaping my idea of what I wanted in an old school dining room even before I moved in. Much of Milwaukee is 1920s Craftsman and Bungalow homes. Even many of the period apartments and condos I toured had the signature woodwork: Wide baseboards, lots of trim, built in cabinets, stained glass accent windows.
In this period dining rooms and front rooms were front and center to receiving guests. Not until after WWII would nicer, more styalized appliances, and eat-in kitchens draw the focus away from Dining Rooms.
My home is a product of its limited foot print. Not only is the dining room the most prominent room in the house, it’s also the first place you step as you come in the front door, there not being room for a vestibule or extended entry way. I wanted to make it special and really the show piece it was supposed to be.
Several of the homes I’d visited inspired exactly what I wanted and since they were nice enough to put lots of photos on Zillow, I shamelessly ripped off their styles.


Two of the elements were already in place. The china cabinet and stained glass window. The former needing some restoration, the latter having been attended to at some point in modern history. The elements I wanted to replicate were the wide, natural wood molding and picture shelf running adjacent to the china cabinet.
There was a small piece of it right by the kitchen door, plate holder groove and all, but it didn’t go anywhere else, and there’s no evidence it ever had (baseboard and intersecting trim showed no sign. My guess would be it was a primo option, the initial occupant didn’t spring for.


I was able to gently disassemble this segment, and sent it off to a friend who is a production carpenter so he could replicate enough of it to cover the adjacent wall, under the stained glass window. He came back with miraculously accurate copies of the wall plate, picture shelf, cove and lip moldings within weeks, and I squirreled them away until I had time to start this project.

I also really liked this box of paint and trim around the light fixture I spotted in a particularly detailed restored home from 1915 in another part of town. This home was a bit more of a Victorian/Edwardian/Bungalow hybrid, but I liked it, and I’m not building a museum. So, I saved that for something I wanted to replicate.
Thirsty Walls and Textured Corners
In classically misguided style, I started several elements of the project all at once, but I knew paint was going to be key. I lived in white apartments during and since college and I’d had enough of it. There would be color in this room (and eventually the rest of my home)
I made some early efforts to seek out colors on my own, I knew I wanted a green accent between the paneling, but I found myself choosing shades that looked great in the sea of cards at the hardware store but were too harsh and bright for painting a whole room.


Rather than continue my fickle trips to the hardware store, I decided to continue my plagiarism with some color selections right from the Behr catalog. I felt this tan and green color really fit with the dark wood trim I would be creating. (I would be staining, not painting it. Whatsthemattayou, Behr! I get you sell paint, but c’mon)
A whole lot of mixing, rolling, brushing, ladders, a broken broom handle, and returns to the store for a second gallon of the khaki color, I made some real progress.


The walls had been textured at some point and it made it tough to get a nice clean line between the ceiling and walls. I may yet go back with a little artists paint brush and clean it up. I tried one of those rolling edge tools, but on the textured surface it was like driving a lowrider off-road.

I measured out the box for my ceiling and painted the inset area before putting up the trim. (I also removed the prisms from my light fixture so I would decrease the risk of breaking them on my many trips up the ladder)
Wood Dye…. You mean Stain right?
One of my big concerns in doing this room is to do everything in one campaign. The move-in and aquarium had seriously mandated a completion date for the living room, but I have no such constraints this time. I wanted to do all of the woodwork and to get the floors really right. Especially as this includes the entry way, the first impression of the house.
Refinishing the woodwork and integrating the new trim would be a challenge in matching. I knew nothing was going to match the 100 year-old, tobacco/coal/time/UV aged shellac, but once its gone, what color do I go with? And how do I make the new pieces made in birch and maple match the original stuff which was a mix of oak and other unidentifiable materials?
Initial tests with stain were not super reassuring.
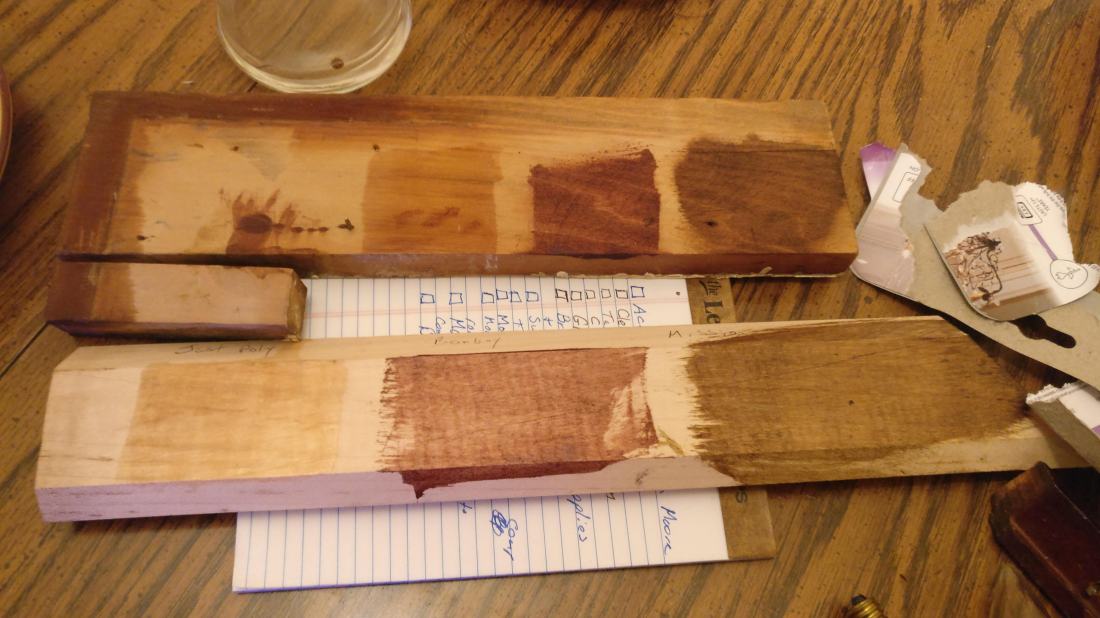
My friend, the carpenter, came to my aid.
“Wood dye” he said.
“…. not stain?”
“Nope, it’s water based, absorbs better than stain and is super consistent even on woods like maple.”
So, I went to Rockler and bought some Transtint dye “Mission Dark Brown” seemed appropriate. I mixed it up in a big plastic tub (with lid) of hot water. It goes on just like water colors. I learned about water “raising the grain” a process of micro-warping fibers in the wood. It makes the wood furry and rough to the touch, but a quick buff with fine steel wool resolved that. I have just about everything except the cove molding dyed. And some of the wood has moved onto polyurethane with a semi-gloss.


Nailing things to the Ceiling is the Worst
No clever title, just truth. With much of the wood moving through my assembly line of dying, sanding, redying, sealing, sanding… you get it, I prioritized my trim for the ceiling as it was smaller, dried quickly and was something I could check off the list as done in fairly short order.
It looks great, I need to touch up a couple white dots where I didn’t get the final coat of paint perfect, but you have to study to find them. More than a few choice words and dropped nails…. followed by choice words, went into getting it mounted though.

I will wait to swap the light fixture until the rest of the room is done. Should anything happen to one, I’d prefer it be to the current one.
Going Forward
I know that was a lot of information, and it represents about a month of weekends and a few particularly ambitious evenings. I realized to advance the woodwork any further will mean cutting and fitting it. This presents some challenges with the baseboard on the long wall to align everything. Thus, I pulled the baseboard. I will cover that in a future post in better detail.
Having the baseboard off and realizing next steps will mean putting it back, I put the woodwork on pause. I have the most unfettered access to the floors that I will have, so I guess that’s up next. Ugh, I’ll get the respirator, alcohol and rags….
Thanks for reading!

One thought on “Dining Room Restoration Part 1”