Part 2: I dive into the shallow end of floor restoration
Past, Present and Future
The aim of this post and its predecessors was to try and encapsulate the efforts I had already taken before starting this blog. Buying the house was a big undertaking in itself and the early lessons in floor refinishing was also a big milestone.
Many of the other things I’ve been working on are smaller and about keeping the house up. Some I documented in pictures, some it did not occur to me. A few are large enough I will put out a unique post for each.
To avoid monotony, I will round up a few more of these small projects in a list here and then move on to the rest in a present voice, even if a few of the stages overlap. It’s easier to tell about building a workbench from start to finish than to show the overlapping tasks and occasional complete distraction of a different project. IF anyone decides to read this and has questions about these projects, I’d happy to go into more detail and/or pictures.
Side Projects
The Basement Stairs
When I originally toured the house, I couldn’t help but notice the basement stairs were old, a little rickety and leaned to one side. However, between that first visit and a final inspection, they had been painted, had a new railing and were straight.
With plenty of other things to worry about, I ignored them for a few weeks until I heard a stony *clink* sound and they shifted and were crooked once again.
Walking underneath them (there’s a sort of crawlspace under the landing and rear entry door) I found that the former owner had simply propped up the decrepit stringers with stacks of old bricks. One of these bricks had shifted in my many trips up and down and it had fallen out of place.
I was in the process of moving and working so my father came by and cut a lot of the parts for the stairs, matching the old parts and using new metal bracketing. I helped him pour a small concrete pad as a level landing ground (the stair case is far more level than the basement, landing or probably even the house.
Once the concrete was dry, we assembled the stairs.


I’ll probably hit them with satin polyurethane when I crack open the can to do my dining room floors.
Mortise Lock Cleaning and Polishing
I noticed that a few of my doors were crooked or didn’t hang well, some gentle shimming in most cases and a bit of chisel work on another, and I was able to have most doors in the house latching nicely.
Some did not open so well, wobbly knobs and sticky latches. So I took to remedying the worst of them.
Removing the lock is pretty easy, loosen a knob, remove it and the post. Remove the two screws on the lock cartridge and slide it out.
A single screw was holding the lid on the cartridge and this is what I found inside.
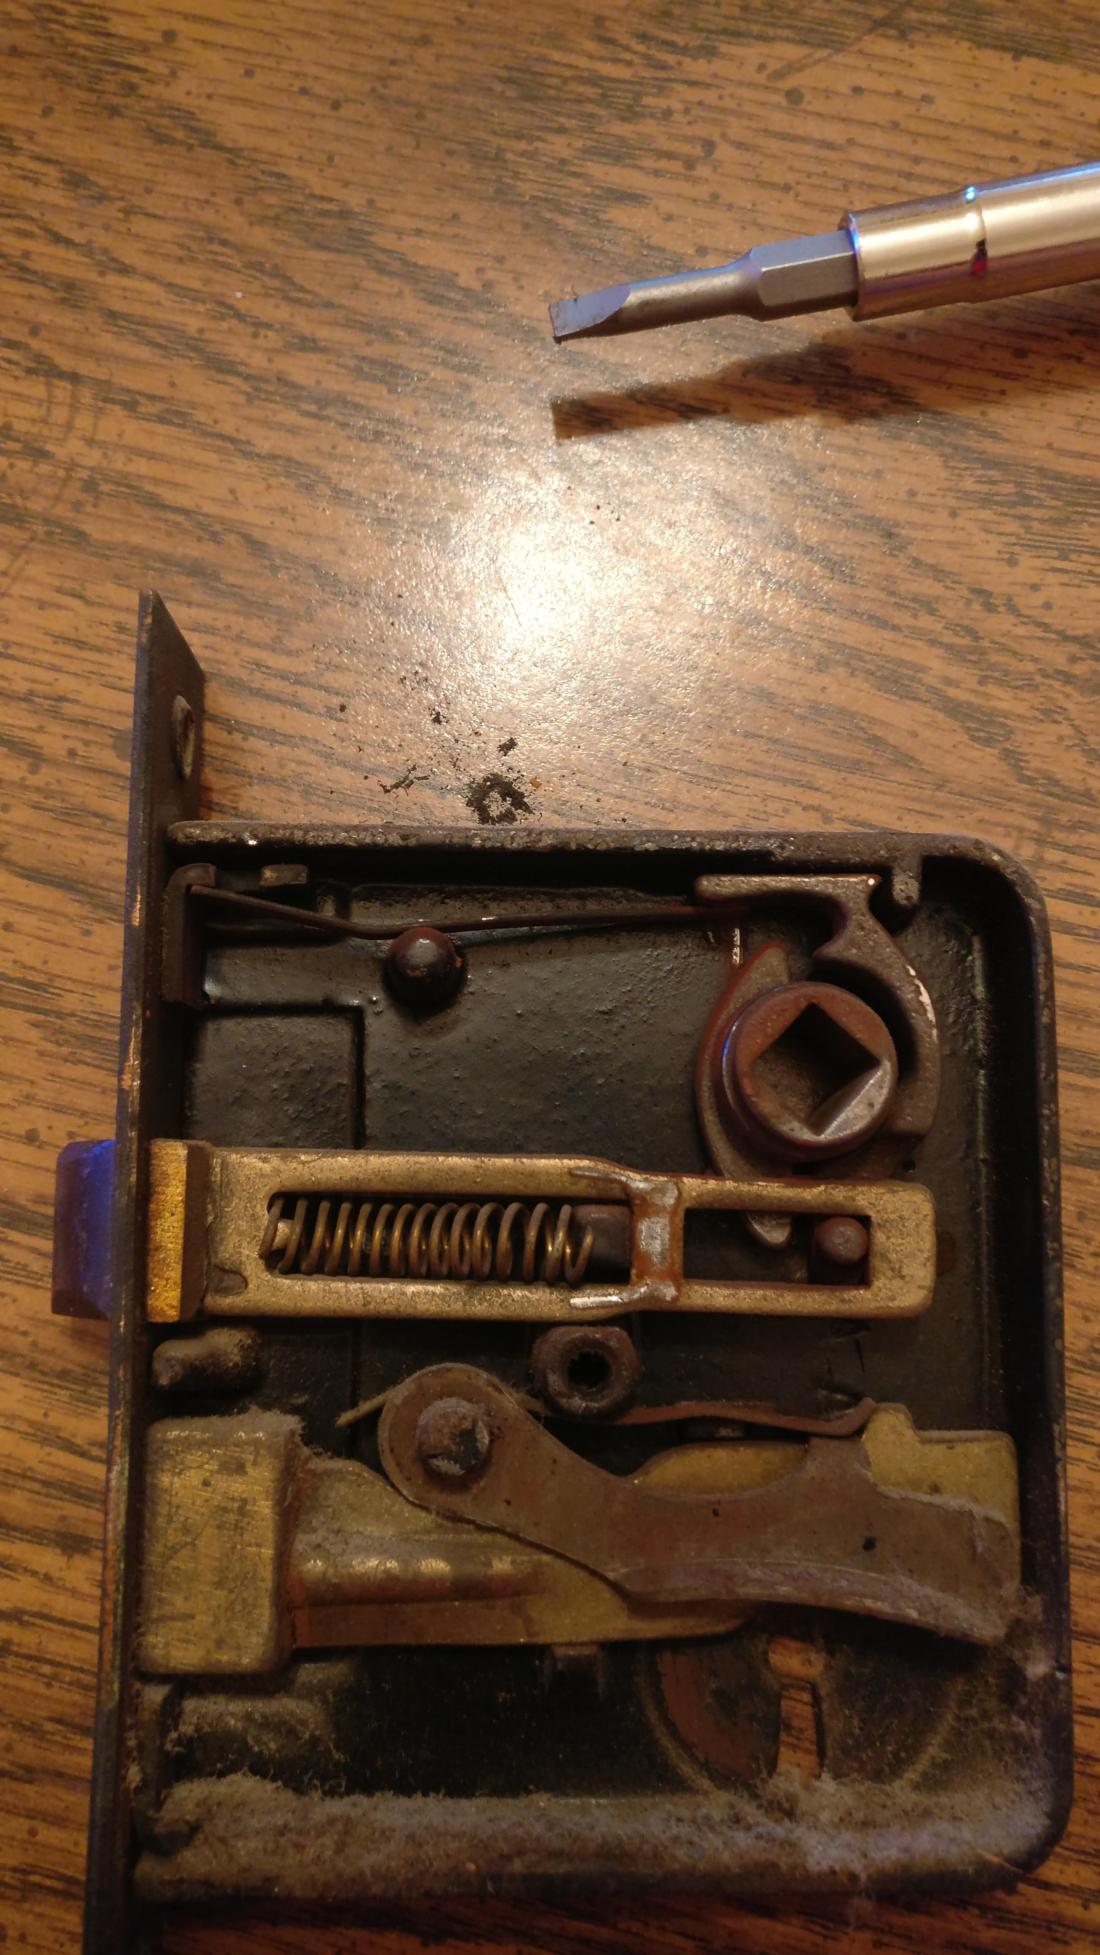
The workings are fairly simple, but the amount of dust and rust inside floored me. This one, from the master bedroom was far and away the dirtiest and most rusted. I cleaned it out, used Flitz metal polish to clean all the surfaces and reassembled. (after taking lots of pictures of how it went together first!)
Voila!

After reassembly, the latch turns like a dream. a little graphite “poofed” inside should keep it turning nicely without attracting dirt.
I did this to a few others. One had broken leaf springs (those little brass zig zags) but worked without them. The main purpose of the one at the top being so the knob doesn’t have so much play, and the bottom one being for the lock which I don’t use.
Now I’ll have to find a skeleton key for them!
Sir Projects-Not-Appearing-in-this-Film:
-
Garage Door Opener:
- The garage is on the old side and in need of some attention. The former owner did not use it for decades for anything but a garden shed. The entry door (human sized) is in need of some eventual work, but the car door did not open at all from the outside due to some bent and poorly installed parts.
- I initially replaced the manual latch and lock mechanism. The design hasn’t changed much over the years and a swap was fairly easy. However, it was still awkward to try and get out of my car in the narrow alley and open the door, and the garage is small enough that walking around the car inside to open the door was awkward. I priced out an automatic opener.
- I selected a very basic chain driven opener. The door is very light and sound is not a concern being that the garage is detached.
- One of the big challenges was the fact that there had never been a motor up there before, so there was no supporting lumber. Being that this is definitively a 2 man job, my father helped me to assemble the unit. I had to mount a 2×4 between studs at the front of the garage above the door for one mounting plate. For the motor supports, we built a box of 2x4s across the rafters of the ceiling.
- There was no direct access for electrical, so it is temporarily on an extension cord to an outlet further away. I need to remedy this and will take lots of pictures of my ventures in electrical work (with some assistance from my uncle a union electrician) soon.
-
Painting and caulking
- Pretty much says it all. A lot of the woodwork on the railings and pillars were in need of paint, Used a strong sealing primer and then some white exterior latex paint and “Tom Sawyered” it up.
- I had some water in the basement after I initially moved in, puddles and moisture. I invested in a dehumidifier and started hunting the cause. Clogged gutters and cracked gangway were the combined culprit. I cleaned the gutters and put a lot of self-leveling sealant around the foundation, particularly where an old drain makes for lots of cracks in the walkway near the foundation.
-
Yard Waste
- Beyond the normal trimming and raking, a lot of the garden plants left behind by the former owner got a little unruly, and in the chaotic month or so of moving in became a veritable jungle. I got it down to a manageable place pretty much in time for everything to die of cold.
